
Maintaining Your Front Suspension
Originally posted to El Cantar de la Lluvia on Tuesday, April 17, 2007
In this article I'll cover the procedure one follows to change the fork seals, oil, sliders and to carry out a general maintenance of the front shocks on the 1996 XR 250 R. The same procedure is valid for newer XRs.
The first thing you should do is download the shop manual. Don't try the things I'm doing here without having printed it out and read it a few times. Yes, I mean it.
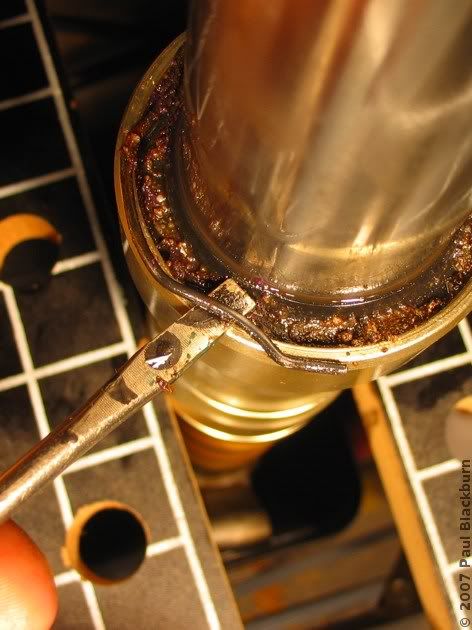
After returning from the trip to the Carretera Austral I noticed some damp dirt around the bottom of the rubber cover of the left fork, the fork boot. I unscrewed the fork boot clamp, and found a small amount of oil and grit sitting on the fork seal. Apparently it only leaked under heavy use, like an outing to the Cajón del Maipo, and similar things.
It was time to learn how to change the fork seals. I'll confess that this process scared me a little, because of possible complications, but now, after having done it all, I wouldn't think twice before doing it all over again.
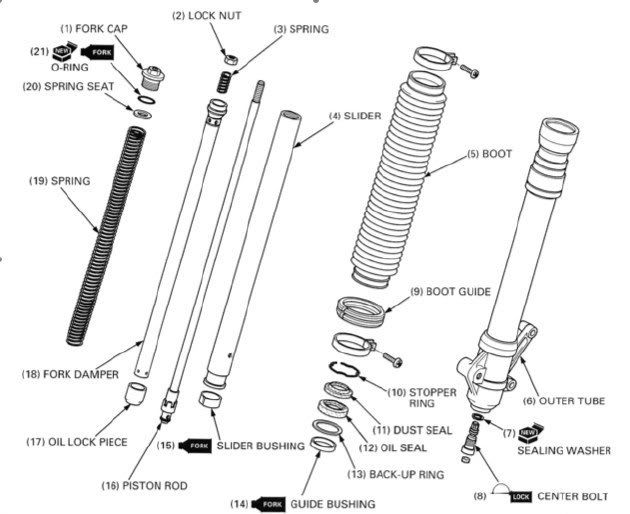
As in the article on lubricating your rear suspension, I had every single piece that you see below in my hands, as individual and separate parts.
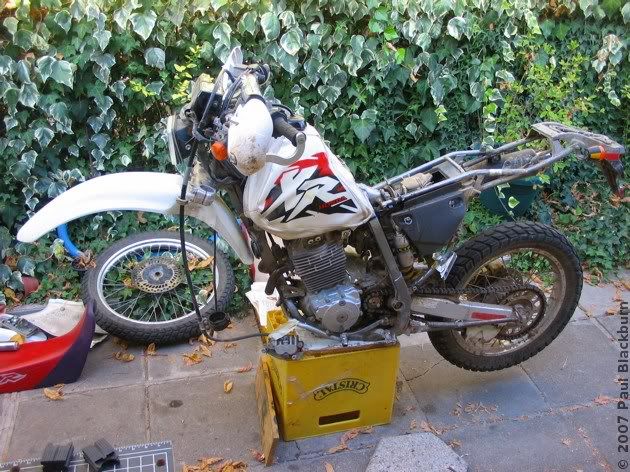
Having done a valve adjustment and an oil change a few days ago, at 29685.1 km, I started to take things apart. I removed the seat and side panels to clean off the bloody mess I left the other day.
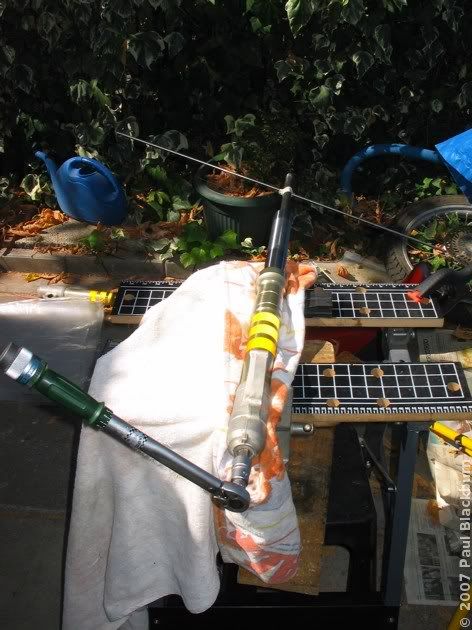
First, clear a large area for working. You'll need the same tools you've always used on the bike (including the Honda standard set of sockets: 8, 10, 12, 14, 17, 19, 24; plus a few Allen keys) and you'll need a few extra things: a workbench with a vice, an old towel, a ruler or vernier caliper, a metre of wire, carb cleaning spray, rust-eliminating liquid if needed and, finally, one 22 mm socket and two tools you'll have to make. More on that later.
The fork seals are easy to come by in Chile. You can get them at iMoto. The sliders have to be ordered from abroad, but I don't think you'll need to change them except in... well, exceptional situations (more on that later, ahem).
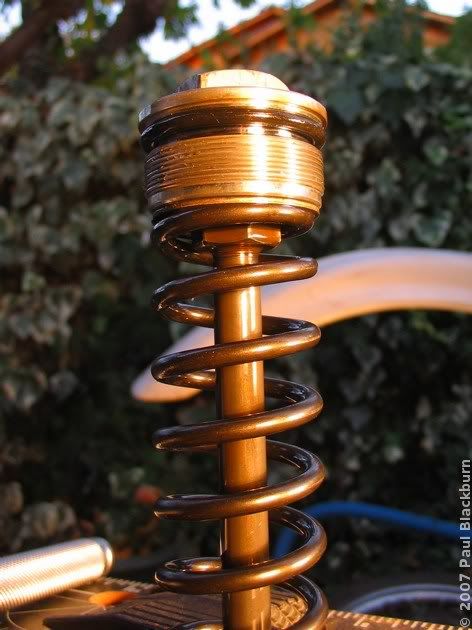
Fix the shock so it is vertical and its surface is not damaged (chrome or aluminium), and remove the rubber plug from the lower end.
Note how many clicks it takes you to get to the end, going anti-clockwise. This leaves the compression damping at a minimum.
Remove the top end. The best approach is to put the fork back on the bike, tighten the triple clamp, and then try to get it off with the 22 mm socket.
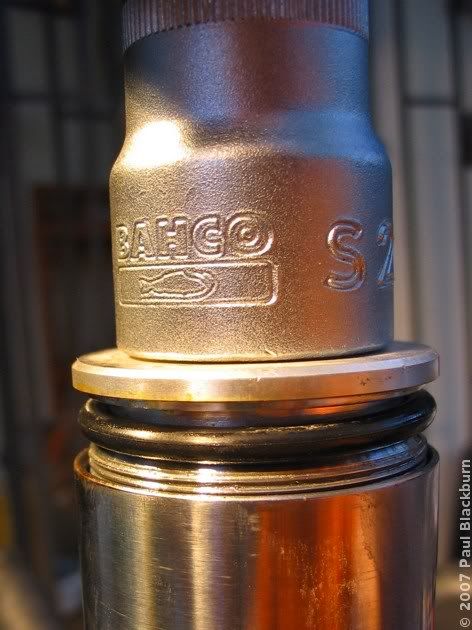
Out comes the cover, the spring, the piston rod, the lock nut and the spring support disc.
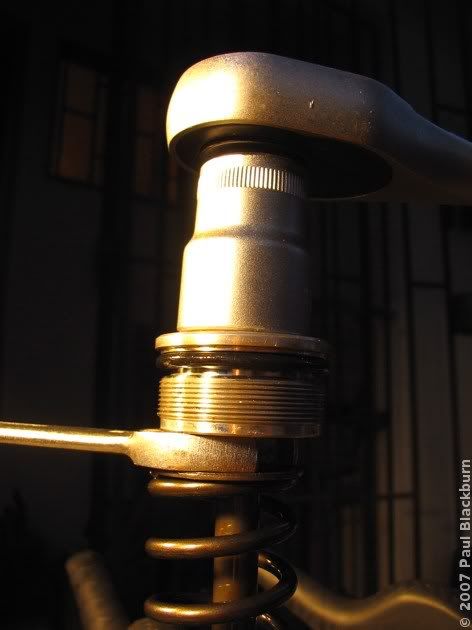
Using your hands, compress the spring and stick a 14 mm crescent wrench between the lid and the spring support disc, thus holding the lock nut tight. Use the 22 mm socket again to get the lid off the piston rod.
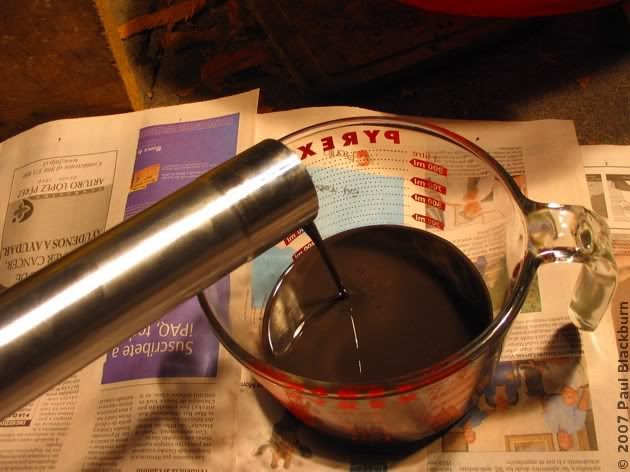
Carefully remove the spring. Pour the oil into a container. Pump the slider gently, being extremely careful not to pull it so far out of the outer tube that the sliders (that are inside the outer tube) come into contact with the end of the slider, which has a grooved surface– not smooth and chromed like the rest of it. This surface will destroy your slider's suface if you're not careful. Don't make the same mistake I did.
In summary, pump the slider gently, and then stick your fingers in it, grab the piston rod, and pump using the piston rod. This piece can be taken to the full range of its motion.
When all the easy oil has been drained, you'll feel the difference: all parts will move easily. If they go slow at the end of their range of motion, there's still oil in the system.
Being careful not to damage the slider's chrome surface, remove the stopper ring from the outer tube.
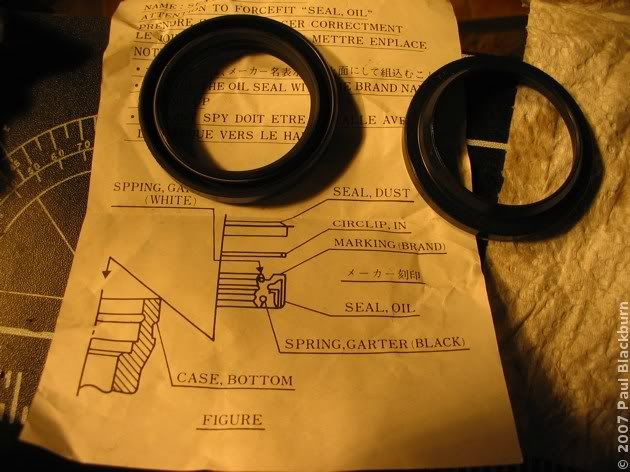
The sliders won't be needed yet, but keep them handy for later. Here is the oil seal and dust guard. They are sold together.
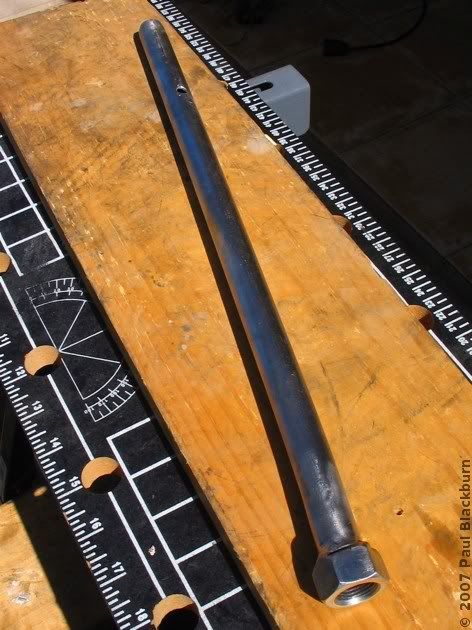
This is the tool you'll need to make, unless you can come up with another way of doing it. Don't be lazy and buy one; making it is easy.
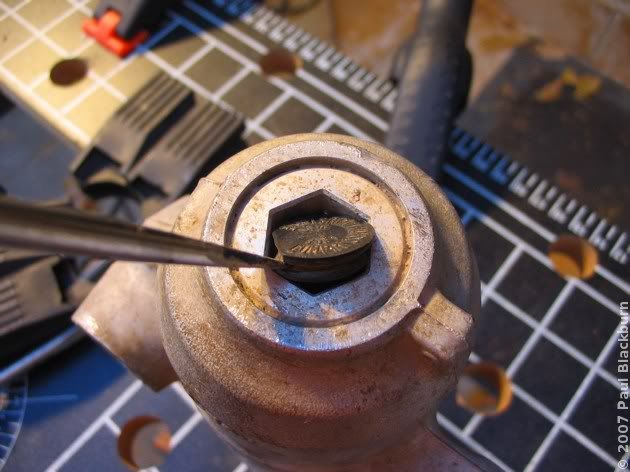
The next step is to introduce a 14 mm Allen socket into the base of the shock, so as to unscrew the bottom plug. The problem is that the bottom plug does not connect directly to the outer tube, but rather to an inner piece that will rotate freely if nothing is done about it.
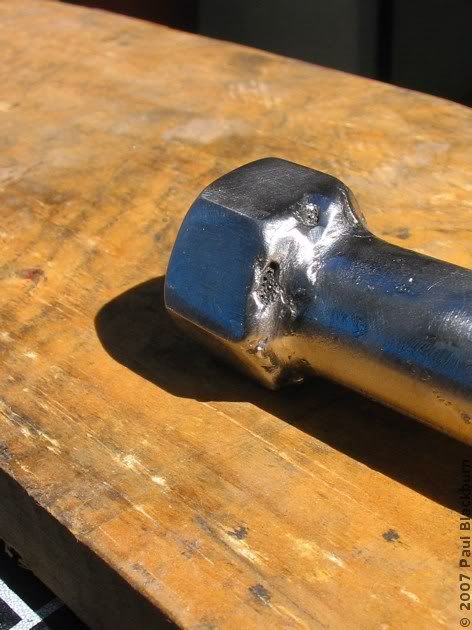
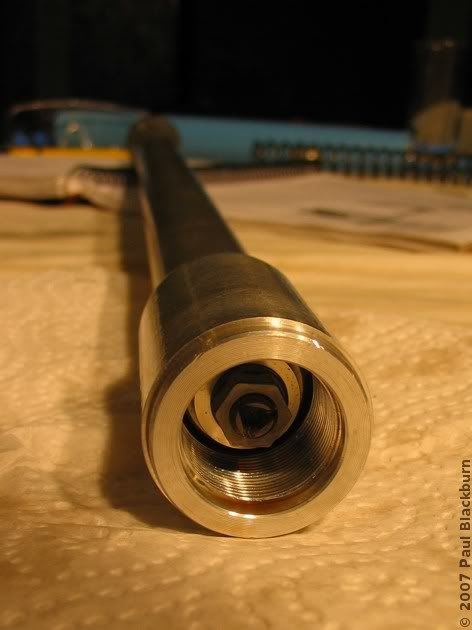
You need to get something down inside the other end of the slider. At the bottom, way inside the shock, there is a hexagonal hole, precisely the shape of a 27 mm bolt. In other words, the opposite faces of the hexagon are 27 mm apart. If you can safely wedge something in there, the lower plug can be removed.
With Octavio's kind help (and welding machine), we made this tool. It's a bolt of the size given previously, welded to a 40 cm tube.
Place the shock on your work bench. Use the vice to hold it firmly, protecting the metal surface with a folded towel.
The tool has been drilled near the end, so a screwdriver can be inserted to keep it steady. In this case, I'm using a stainless steel rod left over from when I made the support for my saddlebags. This must be held by a helper, or fastened to something firm so it can't turn.
When the lower plug comes out, this is what it looks like:
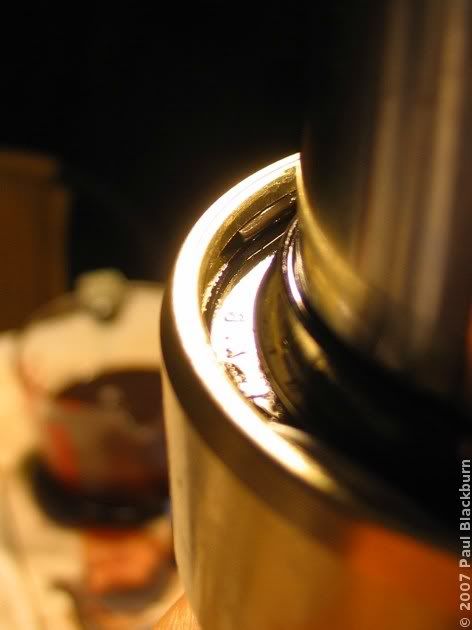
And this is what you see looking into the outer tube.
The lower plug screws onto the fork damper, and inside it goes the damper rod. Yes, the names are confusing, look at the parts diagram.
Here you can see the fork damper's large head, where the tool you made goes, and the damper rod sticking out the end.
Note the presence of rust. This must be corrected.
The widest part of the fork damper is a teflon ring.
And this is the lower end of the fork damper. A simple aluminium piece has been removed, the oil lock piece, which fits simply onto the fork damper.
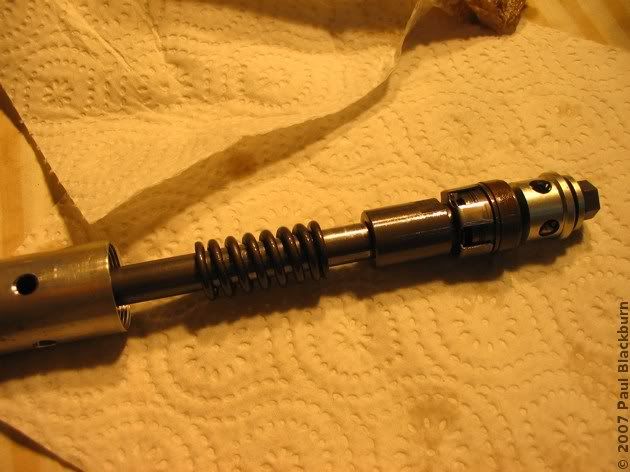
So, we have: on the left the oil lock piece, then the damper rod, that has a piston and a slider on its lower end, and a small spring that prevents the piston from getting whacked by an abrupt extension of the shock. On the right, the fork damper, basically a hollow tube with some holes in it and a large head.
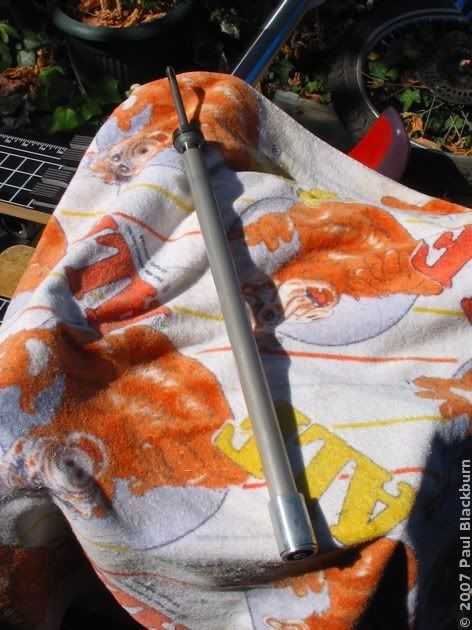
Now that we've removed the fork damper and the damper rod, grasp the outer tube in one hand, and in the other, the slider (in other words: the aluminium one in one hand, and the chromed one in the other), and extend the slider out to its maximum range. Be very careful when it gets to the end of its run, because of the aforementioned grooves. Don't bend the pair or subject their union to torques.
With short and firm tugs, pull the slider upwards (to separate them) making the oil seal and dust cover pop out due to the hammering they're getting from below.
This is what you'll see. Here, the oil seal, then the back-up ring, a ring that helps keep the oil seal in place, then the guide bushing, one of the two slider/bushing pairs found in each fork. This is what gets damaged easily, so be careful. Finally, the slider bushing. Here it is in its normal position, and you can see the grey colouring of its teflon coating.
A zoom of the two sliders. The guide bushing, above, has teflon only on the inside, and the slider bushing, only on the outside.

Initially I thought that the damage on the guide bushing was due to the crash, but I then figured out that it was my own fault. Don't let this happen to you!
The slider bushing.
Now that it's all taken apart, it's time to restore and clean things. Ugly, no?
Apply wet sandpaper, very fine grain, and the superficial rust will be gone. Use the rust dissolving liquid to get at the small pits and craters. Do this using gloves (nitrile gloves, for example) and eye protection. Rinse it with water and detergent, and dry it with a hairdryer or something similar, so everything dries quickly.
Now for the general cleaning procedure. With a can of carb cleaner (and using gloves and eye protection), take all pieces that are made from nothing other than metal and clean them using the spray and paper towel. The other items, like the damper rod, the lower plug and, in particular, the sliders and seals, must be cleaned using fresh fork oil and paper towel.
Here's the clean interior of the slider.

To remove the slider bushing, use a screwdriver, but being very careful not to damage the teflon coating.
When you put everything back together again, place a thick plastic bag, like a Ziploc, over the end of the slider. This is vital both for the slider bushing and the oil seal. Lubricate the piece of bag with fresh fork oil.
Put everything on the slider again, in order.

Oil the interior of the slider slightly.
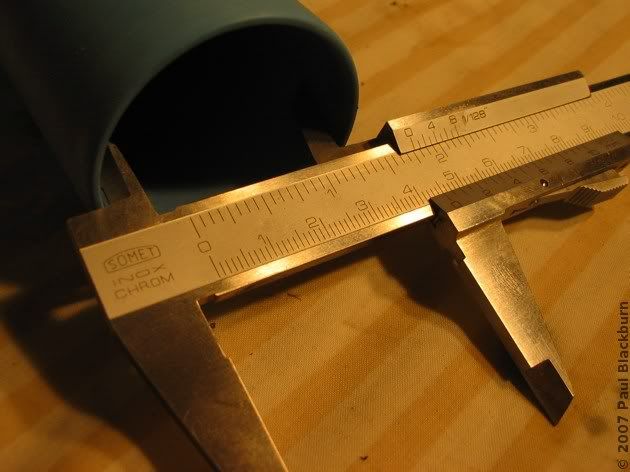
And now for the second special tool: something to shove the slider bushing, oil seal and dust cover into the top of the outer tube. The simplest solution is a piece of PVC pipe, with an outer diameter of 5 cm. It turns out that the inner diameter will be exactly what is needed. Those of you in one of the three countries still using the imperial system of units (Hello to all American, Burmese and Liberian readers!) will forgive the fact that this piece of PVC's width was actually given in inches at the shop (curse your influence!), but that I erased such blasphemy from my mind as soon as I was able to. :-P
Sand the edges, leaving them smooth, regular and rounded.
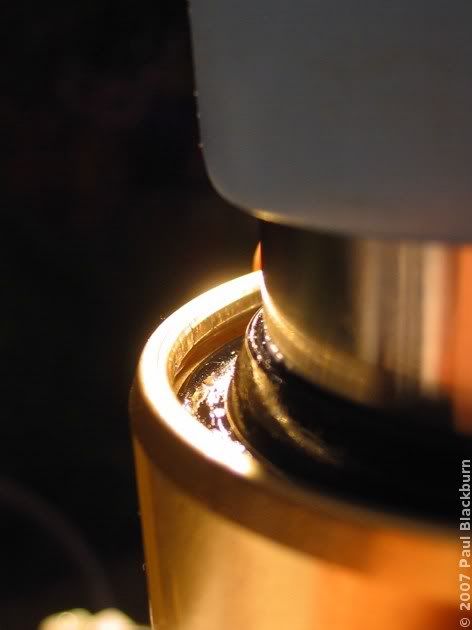
As a hammer you can use a heavy object wrapped in thick cloth. Hammer firmly and gently on the end of the PVC tube. I used one of my dad's old scuba weights.
Stop when the dust cover is just below the stopper ring's groove.
Insert the stopper ring.
Introduce the damper rod in the fork damper, and don't forget the spring.
Place the oil lock piece on the end of the fork damper. What you see sticking out is the piston on the end of the damper rod.
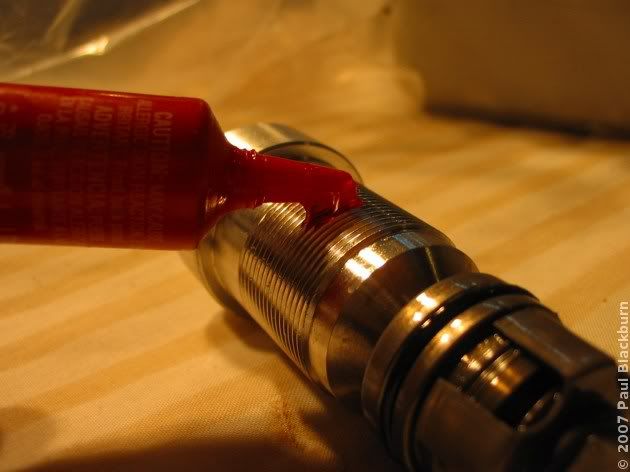
Put a drop of Loctite on the lower plug's threads, and using your special tool, tighten the lower plug to the given torque.
Congratulations, the hardest part is over.
Now, fix the shock on to your work bench in a vertical position. Lower the slider (the chromed tube) and the damper rod until they will go no further.
Slowly pour fresh fork oil into the space between the damper rod and the slider. I suggest pouring a little in, waiting for it to penetrate through the holes in the head of the fork damper (the place where the special tool goes) and then pour in some more. Every now and then, pump the slider up and down slowly, as well as the damper rod.
Note that as the system is filled with oil bubbles will appear, and they'll come out of the fork damper head. Give them time to emerge. Also, it will get harder and harder to move the slider and damper rod. A piece of hose screwed onto the end of the damper rod help to get a grip on it, since its lowest position is a few centimetres below the lip of the slider. Doing this with oily hands can be painful. I should mention that oil goes nowhere if you pour it down the damper rod, as indicated in the shop manual. Tsk, tsk.
Keep on filling. You'll eventually hit 400 cc, and I think that's about when the oil level starts to rise. Calmly and precisely, measure and choose what depth you want.
With the oil level set, place the lock nut on the damper rod, and tie some 60 cm of wire onto the end.
Place the spring and the spring backing disc over the wire. Use the wire to raise the damper rod. This will take some pulling.
With the damper rod peeking out over the spring, compress the spring with your hands and place a 14 mm crescent wrench on the lock nut, as before. Take it to the end of its thread, the lowest point for the lock nut. Place the fork lid on the damper rod, and just like when you took it apart, torque the fork lid to the damper rod.
Now screw the fork lid on the slider by hand, and torque it once it is firmly installed on the bike.
And that, ladies and gentlemen, is the end of the tutorial.
In this article I'll cover the procedure one follows to change the fork seals, oil, sliders and to carry out a general maintenance of the front shocks on the 1996 XR 250 R. The same procedure is valid for newer XRs.
The first thing you should do is download the shop manual. Don't try the things I'm doing here without having printed it out and read it a few times. Yes, I mean it.
After returning from the trip to the Carretera Austral I noticed some damp dirt around the bottom of the rubber cover of the left fork, the fork boot. I unscrewed the fork boot clamp, and found a small amount of oil and grit sitting on the fork seal. Apparently it only leaked under heavy use, like an outing to the Cajón del Maipo, and similar things.
It was time to learn how to change the fork seals. I'll confess that this process scared me a little, because of possible complications, but now, after having done it all, I wouldn't think twice before doing it all over again.
As in the article on lubricating your rear suspension, I had every single piece that you see below in my hands, as individual and separate parts.
Having done a valve adjustment and an oil change a few days ago, at 29685.1 km, I started to take things apart. I removed the seat and side panels to clean off the bloody mess I left the other day.
First, clear a large area for working. You'll need the same tools you've always used on the bike (including the Honda standard set of sockets: 8, 10, 12, 14, 17, 19, 24; plus a few Allen keys) and you'll need a few extra things: a workbench with a vice, an old towel, a ruler or vernier caliper, a metre of wire, carb cleaning spray, rust-eliminating liquid if needed and, finally, one 22 mm socket and two tools you'll have to make. More on that later.
The fork seals are easy to come by in Chile. You can get them at iMoto. The sliders have to be ordered from abroad, but I don't think you'll need to change them except in... well, exceptional situations (more on that later, ahem).
Fix the shock so it is vertical and its surface is not damaged (chrome or aluminium), and remove the rubber plug from the lower end.
Note how many clicks it takes you to get to the end, going anti-clockwise. This leaves the compression damping at a minimum.
Remove the top end. The best approach is to put the fork back on the bike, tighten the triple clamp, and then try to get it off with the 22 mm socket.
Out comes the cover, the spring, the piston rod, the lock nut and the spring support disc.
Using your hands, compress the spring and stick a 14 mm crescent wrench between the lid and the spring support disc, thus holding the lock nut tight. Use the 22 mm socket again to get the lid off the piston rod.
Carefully remove the spring. Pour the oil into a container. Pump the slider gently, being extremely careful not to pull it so far out of the outer tube that the sliders (that are inside the outer tube) come into contact with the end of the slider, which has a grooved surface– not smooth and chromed like the rest of it. This surface will destroy your slider's suface if you're not careful. Don't make the same mistake I did.
In summary, pump the slider gently, and then stick your fingers in it, grab the piston rod, and pump using the piston rod. This piece can be taken to the full range of its motion.
When all the easy oil has been drained, you'll feel the difference: all parts will move easily. If they go slow at the end of their range of motion, there's still oil in the system.
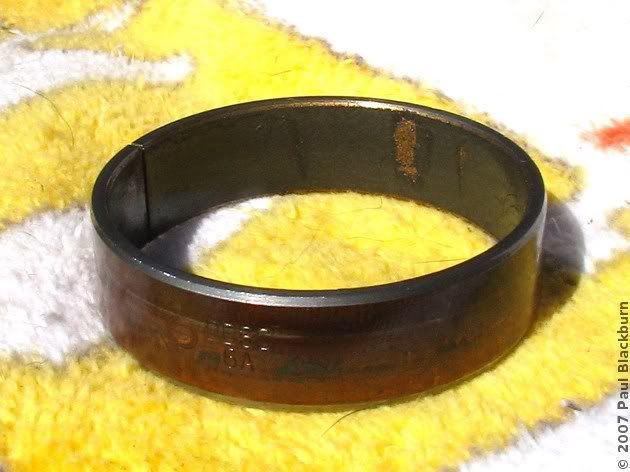
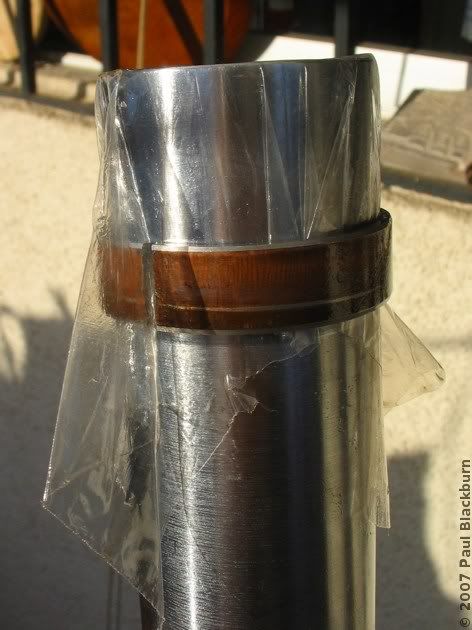
Being careful not to damage the slider's chrome surface, remove the stopper ring from the outer tube.
The sliders won't be needed yet, but keep them handy for later. Here is the oil seal and dust guard. They are sold together.
This is the tool you'll need to make, unless you can come up with another way of doing it. Don't be lazy and buy one; making it is easy.
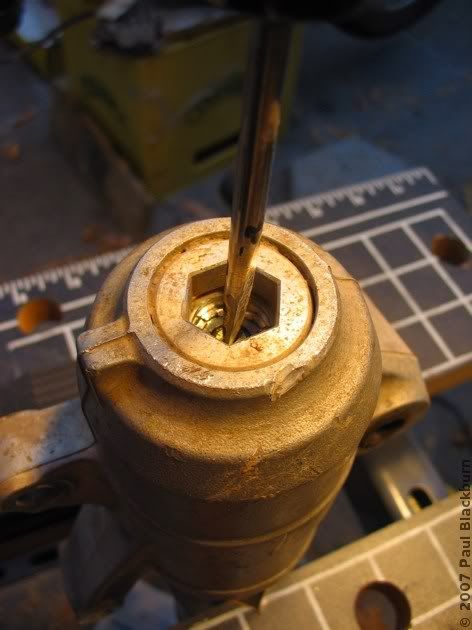
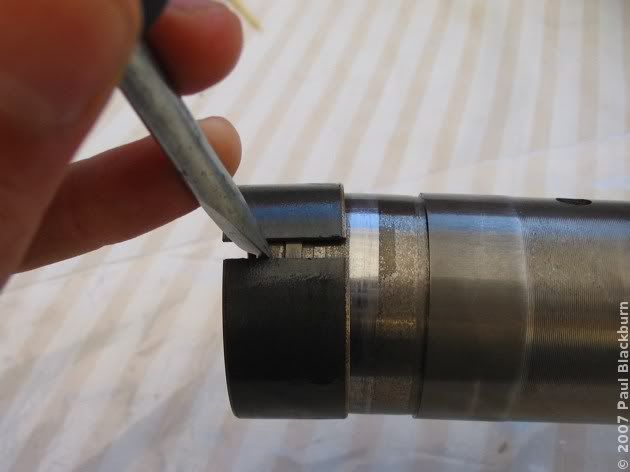
The next step is to introduce a 14 mm Allen socket into the base of the shock, so as to unscrew the bottom plug. The problem is that the bottom plug does not connect directly to the outer tube, but rather to an inner piece that will rotate freely if nothing is done about it.
You need to get something down inside the other end of the slider. At the bottom, way inside the shock, there is a hexagonal hole, precisely the shape of a 27 mm bolt. In other words, the opposite faces of the hexagon are 27 mm apart. If you can safely wedge something in there, the lower plug can be removed.
With Octavio's kind help (and welding machine), we made this tool. It's a bolt of the size given previously, welded to a 40 cm tube.
Place the shock on your work bench. Use the vice to hold it firmly, protecting the metal surface with a folded towel.
The tool has been drilled near the end, so a screwdriver can be inserted to keep it steady. In this case, I'm using a stainless steel rod left over from when I made the support for my saddlebags. This must be held by a helper, or fastened to something firm so it can't turn.
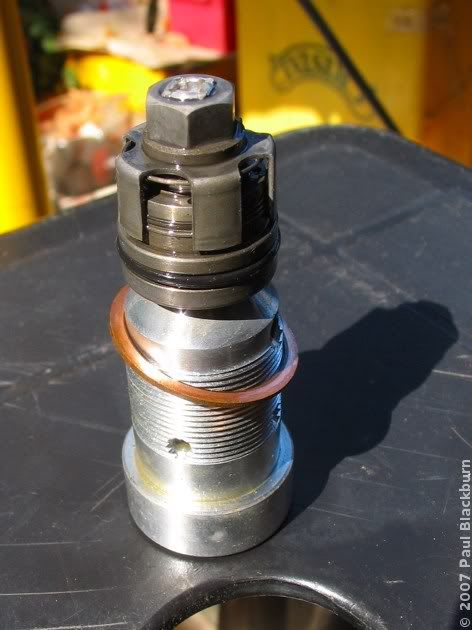
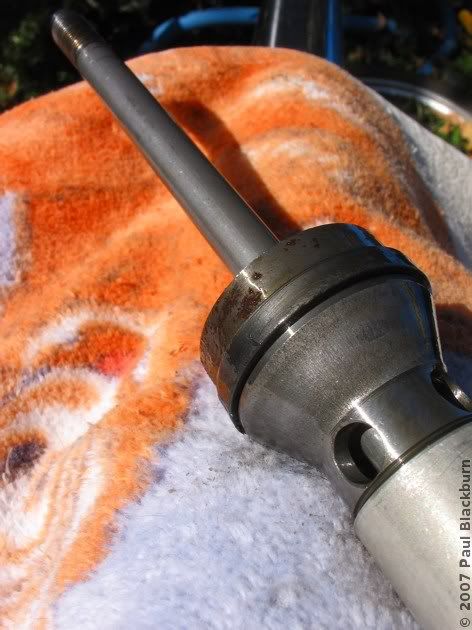
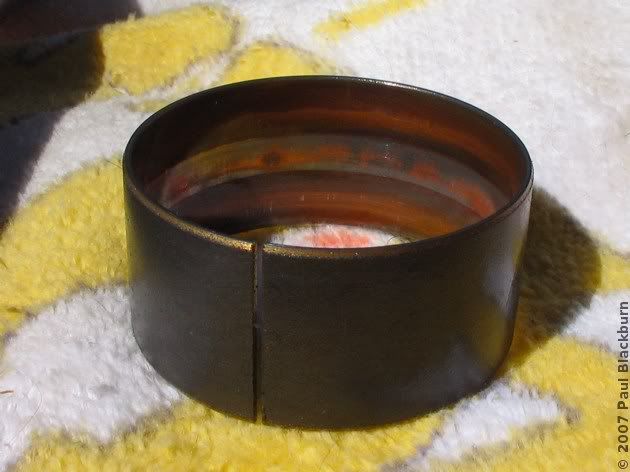
When the lower plug comes out, this is what it looks like:
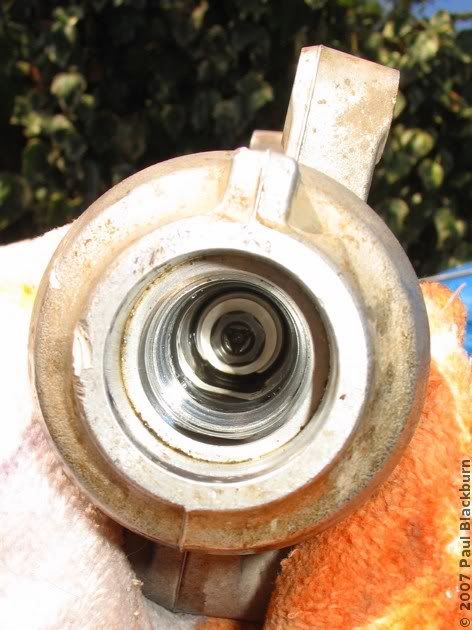
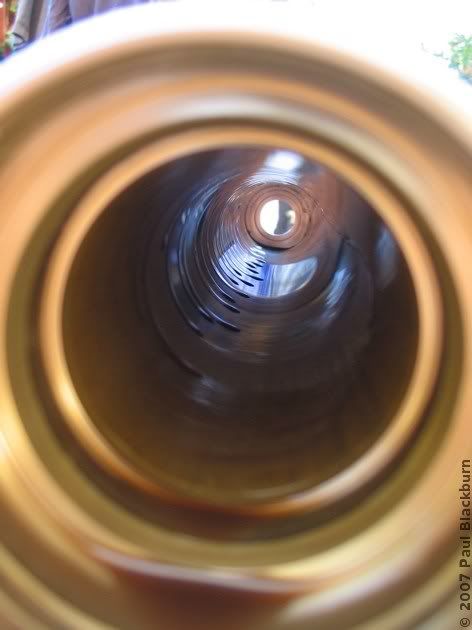
And this is what you see looking into the outer tube.
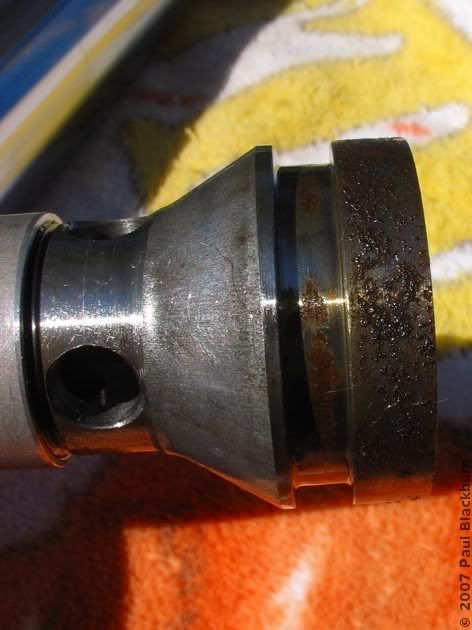
The lower plug screws onto the fork damper, and inside it goes the damper rod. Yes, the names are confusing, look at the parts diagram.
Here you can see the fork damper's large head, where the tool you made goes, and the damper rod sticking out the end.
Note the presence of rust. This must be corrected.
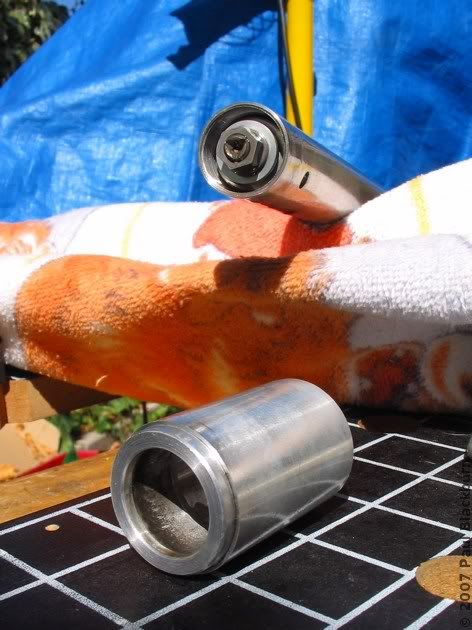
The widest part of the fork damper is a teflon ring.
And this is the lower end of the fork damper. A simple aluminium piece has been removed, the oil lock piece, which fits simply onto the fork damper.
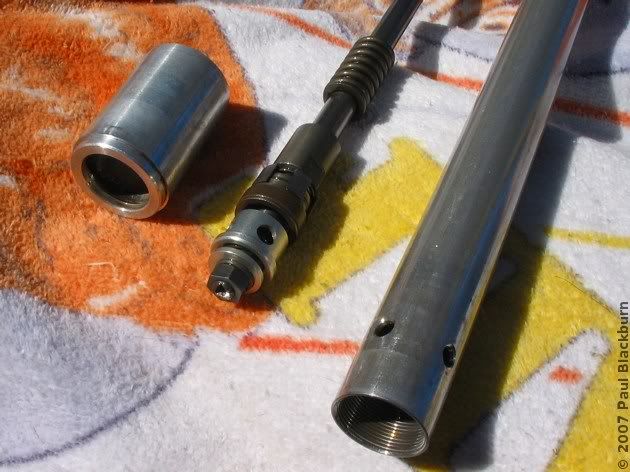
So, we have: on the left the oil lock piece, then the damper rod, that has a piston and a slider on its lower end, and a small spring that prevents the piston from getting whacked by an abrupt extension of the shock. On the right, the fork damper, basically a hollow tube with some holes in it and a large head.
Now that we've removed the fork damper and the damper rod, grasp the outer tube in one hand, and in the other, the slider (in other words: the aluminium one in one hand, and the chromed one in the other), and extend the slider out to its maximum range. Be very careful when it gets to the end of its run, because of the aforementioned grooves. Don't bend the pair or subject their union to torques.
With short and firm tugs, pull the slider upwards (to separate them) making the oil seal and dust cover pop out due to the hammering they're getting from below.
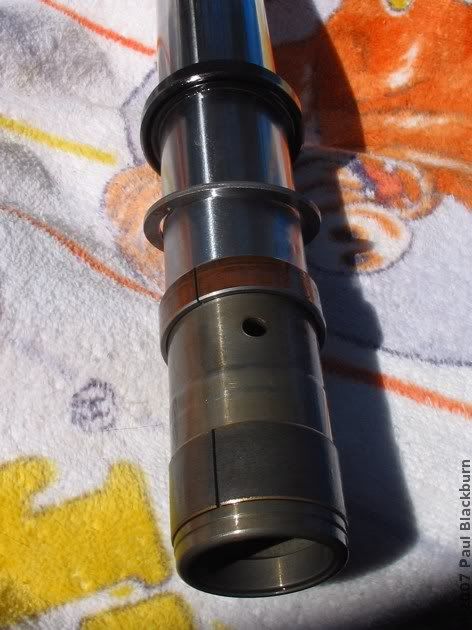
This is what you'll see. Here, the oil seal, then the back-up ring, a ring that helps keep the oil seal in place, then the guide bushing, one of the two slider/bushing pairs found in each fork. This is what gets damaged easily, so be careful. Finally, the slider bushing. Here it is in its normal position, and you can see the grey colouring of its teflon coating.
A zoom of the two sliders. The guide bushing, above, has teflon only on the inside, and the slider bushing, only on the outside.
Initially I thought that the damage on the guide bushing was due to the crash, but I then figured out that it was my own fault. Don't let this happen to you!
The slider bushing.
Now that it's all taken apart, it's time to restore and clean things. Ugly, no?
Apply wet sandpaper, very fine grain, and the superficial rust will be gone. Use the rust dissolving liquid to get at the small pits and craters. Do this using gloves (nitrile gloves, for example) and eye protection. Rinse it with water and detergent, and dry it with a hairdryer or something similar, so everything dries quickly.
Now for the general cleaning procedure. With a can of carb cleaner (and using gloves and eye protection), take all pieces that are made from nothing other than metal and clean them using the spray and paper towel. The other items, like the damper rod, the lower plug and, in particular, the sliders and seals, must be cleaned using fresh fork oil and paper towel.
Here's the clean interior of the slider.
To remove the slider bushing, use a screwdriver, but being very careful not to damage the teflon coating.
When you put everything back together again, place a thick plastic bag, like a Ziploc, over the end of the slider. This is vital both for the slider bushing and the oil seal. Lubricate the piece of bag with fresh fork oil.
Put everything on the slider again, in order.
Oil the interior of the slider slightly.
And now for the second special tool: something to shove the slider bushing, oil seal and dust cover into the top of the outer tube. The simplest solution is a piece of PVC pipe, with an outer diameter of 5 cm. It turns out that the inner diameter will be exactly what is needed. Those of you in one of the three countries still using the imperial system of units (Hello to all American, Burmese and Liberian readers!) will forgive the fact that this piece of PVC's width was actually given in inches at the shop (curse your influence!), but that I erased such blasphemy from my mind as soon as I was able to. :-P
Sand the edges, leaving them smooth, regular and rounded.
As a hammer you can use a heavy object wrapped in thick cloth. Hammer firmly and gently on the end of the PVC tube. I used one of my dad's old scuba weights.
Stop when the dust cover is just below the stopper ring's groove.
Insert the stopper ring.
Introduce the damper rod in the fork damper, and don't forget the spring.
Place the oil lock piece on the end of the fork damper. What you see sticking out is the piston on the end of the damper rod.
Put a drop of Loctite on the lower plug's threads, and using your special tool, tighten the lower plug to the given torque.
Congratulations, the hardest part is over.
Now, fix the shock on to your work bench in a vertical position. Lower the slider (the chromed tube) and the damper rod until they will go no further.
Slowly pour fresh fork oil into the space between the damper rod and the slider. I suggest pouring a little in, waiting for it to penetrate through the holes in the head of the fork damper (the place where the special tool goes) and then pour in some more. Every now and then, pump the slider up and down slowly, as well as the damper rod.
Note that as the system is filled with oil bubbles will appear, and they'll come out of the fork damper head. Give them time to emerge. Also, it will get harder and harder to move the slider and damper rod. A piece of hose screwed onto the end of the damper rod help to get a grip on it, since its lowest position is a few centimetres below the lip of the slider. Doing this with oily hands can be painful. I should mention that oil goes nowhere if you pour it down the damper rod, as indicated in the shop manual. Tsk, tsk.
Keep on filling. You'll eventually hit 400 cc, and I think that's about when the oil level starts to rise. Calmly and precisely, measure and choose what depth you want.
With the oil level set, place the lock nut on the damper rod, and tie some 60 cm of wire onto the end.
Place the spring and the spring backing disc over the wire. Use the wire to raise the damper rod. This will take some pulling.
With the damper rod peeking out over the spring, compress the spring with your hands and place a 14 mm crescent wrench on the lock nut, as before. Take it to the end of its thread, the lowest point for the lock nut. Place the fork lid on the damper rod, and just like when you took it apart, torque the fork lid to the damper rod.
Now screw the fork lid on the slider by hand, and torque it once it is firmly installed on the bike.
And that, ladies and gentlemen, is the end of the tutorial.
Labels: mechanics
posted by durandal at 1:47 PM
![]()


 The Lagoons of the Santuario de la Naturaleza 2: Laguna Los Ángeles
 Race Day At Leyda 4
 El Tabo and the Central Hidroeléctrica El Sauce
 Exploring The Hills Around Lampa
 A Different Route To Baños De Colina
 The Mines of the Cuesta La Dormida
 The Frozen Lagoons of the Santuario de la Naturaleza
 Second Mass Demonstration "For A Fair Tag"
 First Mass Demonstration Against The 'Tag'
 Enduro In Lagunillas
 Embalse El Yeso and Termas Del Plomo
 Ride To Peñuelas
 Cerro Chena
 Race Day at Leyda 3
 Baños de Colina 2
 Carretera Austral: Epilogue
 The Little Giant and Termas del Plomo
 Back on Two Wheels
 2006 Photographic Retrospective
 Race Day At Leyda 2
  Quantum Optics III in Pucón
 Meseta In Chicureo
 Pick Up Your Beer Bottle And Fuck Off
  Planes And Hills
 Cut-Off Road
 Lagunillas
 Laguna Verde 2
 Ride To Anywhere But Aculeo
 Cerro El Roble, Second Attempt
 Baños De Colina
 Some Walk On Water...
 Race Day At Leyda
 Almost Cerro El Roble
 Off To Curacaví with Andrés
 La Serena, Part 3: Back To Santiago
  A Bull, Two Cows and a Chilean Fox
 Escape To Cuesta La Dormida
 Valve Adjustment
 La Serena, Part 2B: Valle Del Elqui
 La Serena, Part 2A: Coquimbo and La Recova
 Mud And Pine Trees
 La Serena, Part 1
 Pimp My Exhaust
 Ride To Laguna Verde
 Ride To La Mina
 Ride To Termas El Plomo
 Camping in Colliguay
 Ride To Portillo
 Ride To Olmué and Con Con
 Siete Tazas
 Watching The Departure Of The Day That Brought Me Here
 Buenos Aires Motorbikes
 Ride to Talca with the Adach Group
 Las Trancas '05
 Towers and Hills
 María Pinto, Melipilla, Aculeo
 Me and my Carb


1 Comments:
Nice how-to! Correction about the special tool - it's a nut (specifically, an M18 nut), not a bolt, welded to a length of tube. If someone makes one with a bolt - he'll run into trouble, because the tool needs to be hollow (hence the nut).
Post a Comment
<< Home