
Valve Adjustment
Originally posted to El Cantar de la Lluvia on Monday, August 14, 2006
A few days ago I finally got down to doing something that I had set my sights on quite a while ago: adjusting the valves on my 1996 XR 250 R. I'm not sure if it would be correct to say that it was due; though the shop manual certainly indicated that it was time for it--
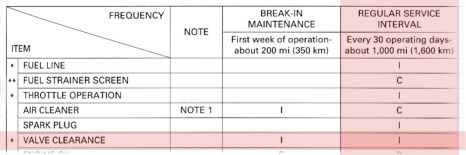
-- this maintenance schedule is probably based on the notion that the bike will be used in a much more aggressive fashion, off-road, where the hours of use will add up faster than the kilometres will. The bike now has about 14000 km on it, and I bought it at 4000. I suppose it got a valve adjustment before I bought it.
In any case, I wanted to learn how to do it. Part of the point of having a motorbike is learning about mechanics, and sending it off to the mechanic will get you nothing but (at best) a serviced bike and (at worst) a complete and utter nightmare. Particularly if you insist on searching for a "good and cheap" mechanic. That's the way things are here in Chile, and it probably isn't that different around the world. (As I translate this post, a few months after I wrote it, and after having recently completed my second valve adjustment, I can safely say that you do NOT want the guy working on your bike to cut corners, or be rushed. If I did this for a living, I'd charge as much as I could, and even then I'm not sure if I'd do it for money. It takes a lot of patience and dedication).
If you do your mechanical work yourself, you can be absolutely certain that things were put back together with a torque wrench, and you know for certain that nothing was damaged in the process (one hopes!). The torque wrench is particularly important when working with bots that thread into the aluminium crankcase, like the oil filter cover bolts, and the oil drain plugs, not to mention the valve gap adjustment nut-- you certainly don't want that coming loose inside the engine, do you now?
Let's start from the beginning.
What is a valve, and why do they need adjusting anyway?
In the following illustration, which depicts a four-stroke engine, the valves are the two flat-headed rod thingies placed slightly diagonally at the top of the engine.
They basically determine when the air and fuel mixture can enter the cylinder, it must remain trapped, and when the exhaust gases can escape. The point is not to explain what an Otto cycle is; for that, take a look at this page.
The illustration isn't entirely correct, since it depicts a cylinder with infinite compression; when the piston is at the top of its journey, it should leave a gap above it. Also, in my engine, the egg-shaped wheel that pushes the valve down (the cam, mounted on the camshaft) doesn't actually push on the valve itself. It does so by means of a rocker of sorts, but you get the idea. The illustration also depicts two camshafts, while in my engine, there is only one central one.
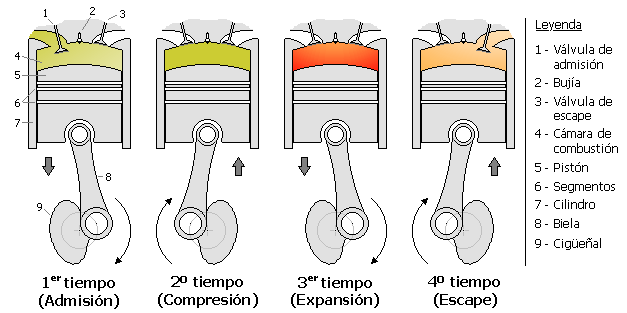
Another illustration of the Otto cycle:
(1st stroke: Admission, 2nd stroke: Compression, 3rd stroke: Expansion, 4th stroke: Exhaust. Also: 1 - Intake valve, 2 - Spark plug, 3 - Exhaust valve, 4- Combustion chamber, 5 - Piston, 6 - Rings, 7 - Cylinder, 8 - Connecting rod, 9 - Crankshaft)
The normal position of the valve's flat head is against the valve seat, forming an airtight seal, allowing the cylinder to remain hermetically sealed off. They are held in this position by a strong spring.
When a valve opens, it does so because it is pushed downwards by the rocker arm. It contacts the narrow end of the valve, and the flat head is moved into the cylinder cavity slightly. This allows the fuel-air mixture to enter, if it is the intake valve, and the exhaust gases to exit, if it is the exhaust valve.
Now the important bit is that between the rocker arm and the end of the valve, there is a very small gap, a few thousandths of an inch across (that would be about 0.1 mm, in more sensible units). This gap is left so that the valves can expand feely as the engine warms up.
If this gap were not left between the rocker arm and the valve, bad things would happen. As the engine warms up the valve will expand, and it will do so most noticeably in the longitudinal direction. Since the flat head is held tight by the valve spring against the valve seat, the tail end of the valve will advance towards the rocker arm. If there were no gap, the tail end would simply contact the rocker arm, and instead the valve would be displaced slightly towards the cylinder, due to its own thermal expansion, thus impeding a proper seal against the valve seat.
The result of this unwanted situation is that the cylinder no longer manages to maintain a high level of compression when it needs to, and thus loses power. Also, if this were to happen on the exhaust valve, the permanent leaking of high pressure, high temperature gas around the valve seat will over heat and even possibly melt the valve. Not a pretty sight.
So as to avoid all of this, we always leave a small separation between the rocker arm and the valve. The exhaust valve's gap is slightly larger, because it will always be slightly hotter than the intake valve.
And what if the gap is too large? As the rocker arm comes down on the valve end, it has longer to travel before it makes contact. Since the rocker arm is driven by a lobe on the cam wheel, its initial velocity is small, but its intermediate velocity is large. If there is an excessive delay before it hits the valve, it will have acquired greater speed, and thus the impact will be larger. This will eventually wear down the rocker arms, valves, camshaft and so on. Also, the synchronization of the valve's opening and closing will be thrown off.
And why do we care about all this? Because it is necessary to check the valve separations periodically, to make sure that everything is in order. And why would it change in the first place? Because things wear down, like the valve, seat, for example. As the valves are hammered millions of times against the valve seat, they will slowly start receding upwards, thus decreasing the gap between the valve and the rocker arm, and we already know that this gap can't be left too small.
Just so you get an idea about what things look like in this engine, here's an expanded view.

Luckily, one can access the valves through four access ports. If this were not so, one would have to remove the valve cover every time, and also probably install a new (not so cheap) gasket every time. Yuck.
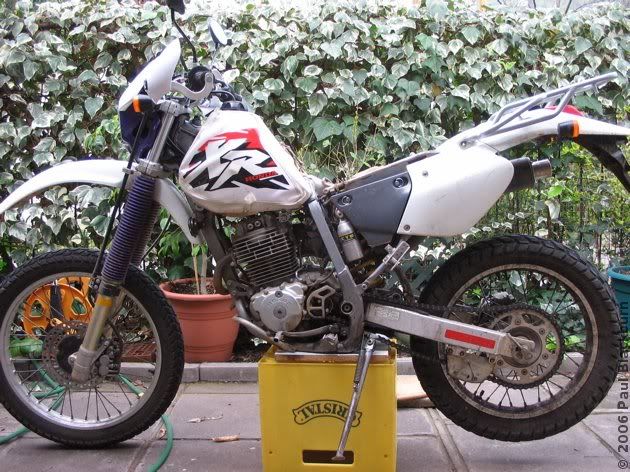
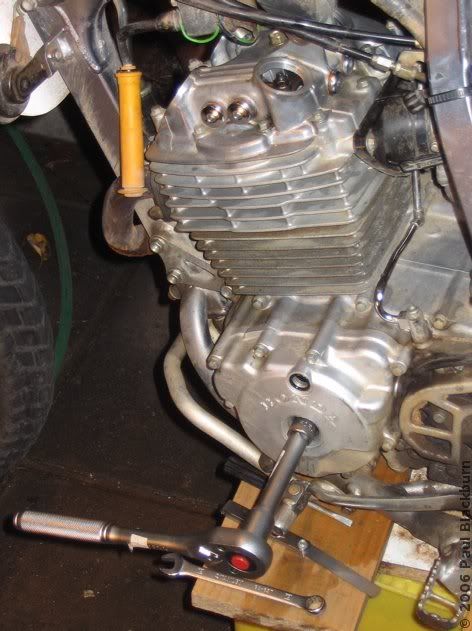
To be able to get at the valves and get to work, it is necessary to remove the fuel tank and the seat. Here's the whole bike:
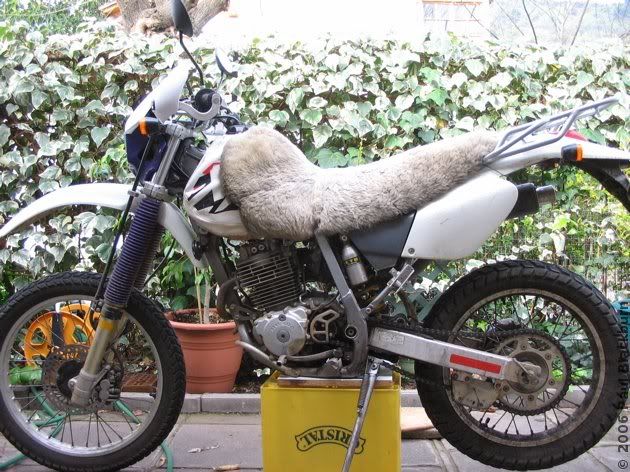
The seat is removed by taking out two 12 mm bolts where the rack bolts on to the frame. A quick yank backwards and it comes off.
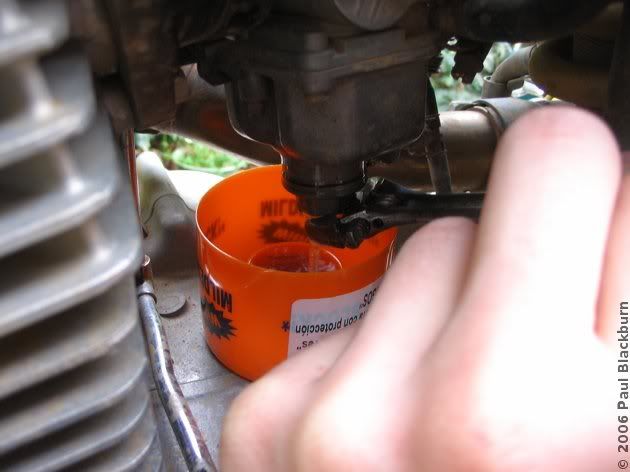
Now the gas tank. I decided to drain the carb's float bowl, because I wanted to change the fuel filter later on. This carb is easy to get at: just remove the plug at the bottom of the float bowl, and you have access to the main jet. This is also a quick way to drain the float bowl.
Then, unscrew the thingy that keeps the fuel line on the fuel petcock.
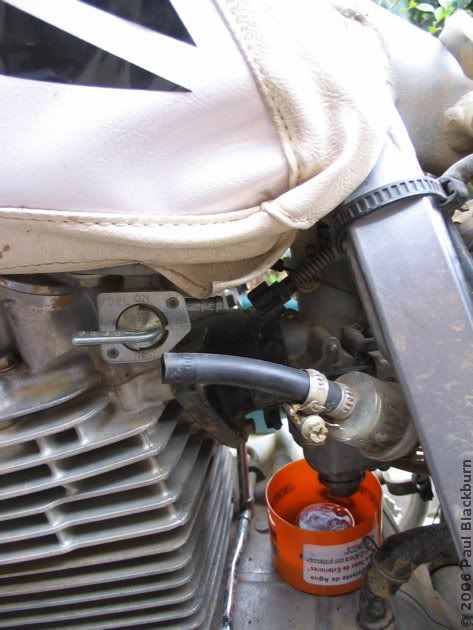
I covered it with paper towel and masking tape, and a bit of plastic bag, because I would later hose down the bike.
The carb's float bowl plug had some crap in it. This is the kind of crap that can ruin a ride if it gets in your slow jet.
Now we can remove the gas tank. I think it's held on by two 10 mm bolts.
And here's the bike, as a skeleton.

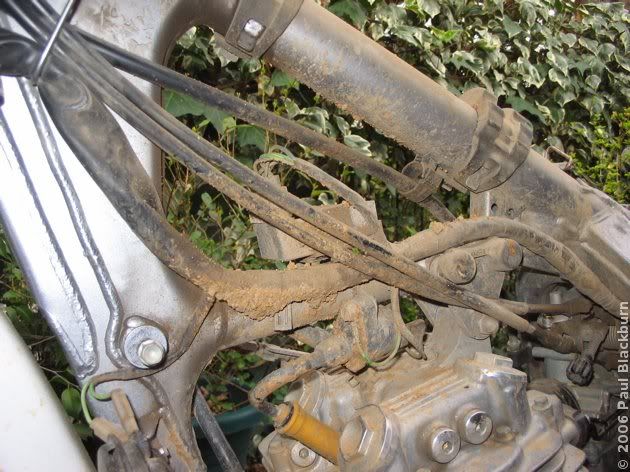
After my ride to Laguna Verde the other day, everything was covered in that clay-like mud, and it would have to come off. It is absolutely inadmissible to have a piece of dirt fall into you engine.
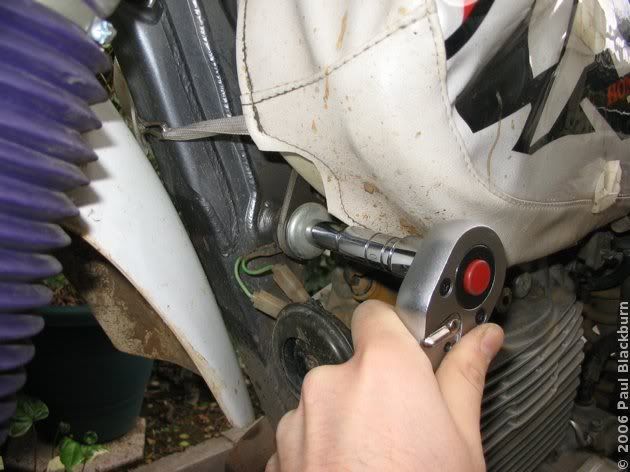
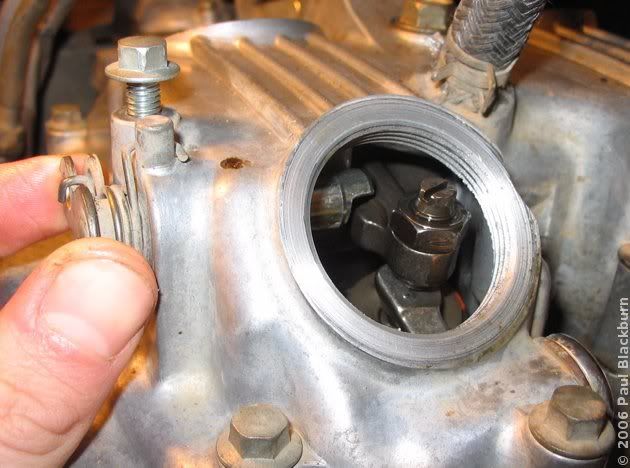
Ok, now everything is clean on the outside. Removal of the spark plug is in order, so turning the engine over by hand is easier, since you don't have to work against the cylinder's compression. I wasn't able to get a good grip on the spark plug with the tool, and I surmised that that was due to the presence of stones and crud around it.
Instead of just using a mirror, like any smart person would do (and this only occurred to me during my second valve adjustment), I shoved the camera in and took some pics.
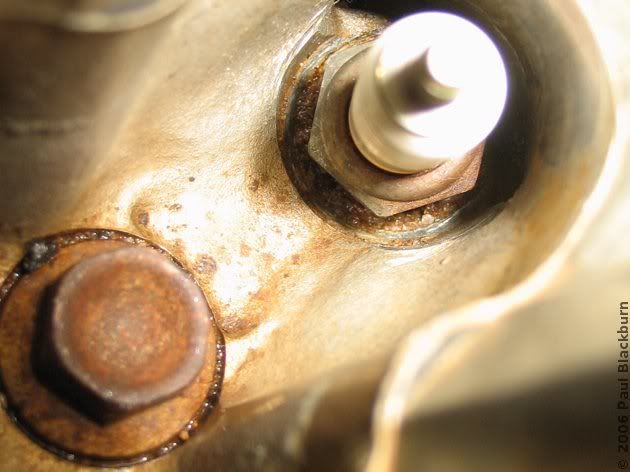
It took me 20 minutes to try to clean that crap out with cotton swabs, bamboo sticks and paper towel. No go. If I removed the spark plug with all that crud floating around, something would certainly fall into the cylinder, and that would be bad. I decided to hose the area, and dry it.
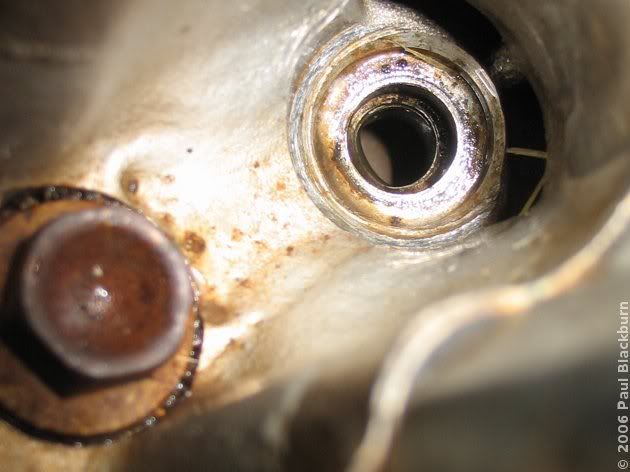
As an almost irrelevant precaution, I decided to make sure that the spark plug was in fact firmly screwed in. I had thought that the reason the spark plug tool went round and round without gripping the plug was that there was debris getting in the way. I reached in and wiggled it, and... it moved! I had indeed been turning the spark plug this whole time, crud or no crud. If I had shoved a hose in here, it would probably have been the end of my engine.
I tightened it up, washed the area, and sprayed WD40 all over the place, and dried everything as best I could with paper towel. I removed the damn spark plug.
One should also remove the manual decompressor cable. This cable connects to a small lever on the left handlebar (which typically evokes the question "And what does this do, then?"). When you pull this lever, the cable operates a mechanism that pushes one of the exhaust valves down slightly. This allows the piston to rise easily, without compressing the air in the cylinder. It is typically used to make starting easier. Sometimes you don't have enough space on the right side of the bike to use the kickstarter (on a hill, for example) and the decompressor allows you to put the piston about halfway up the compression stroke before kicking the kickstarter, and most of the time, this half-kick will get the engine started. Also, if the engine floods, due to having dropped the bike, for example, you activate the manual decompressor, open the throttle 100%, hold the engine kill switch, and kick the engine over several times. This dries out the cylinder and spark plug. If you didn't use the decompressor, you'd be working against the cylinder's compression.
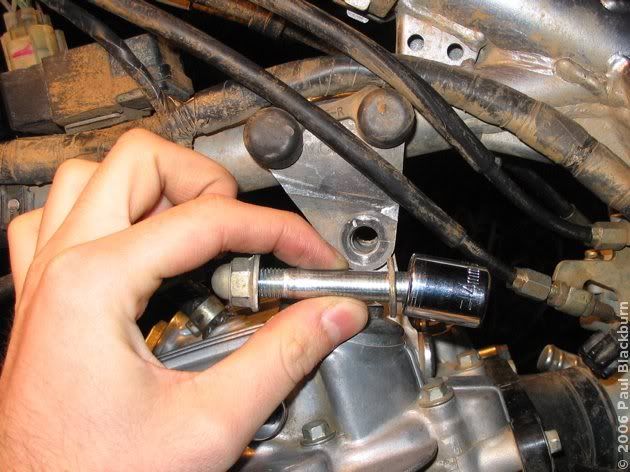
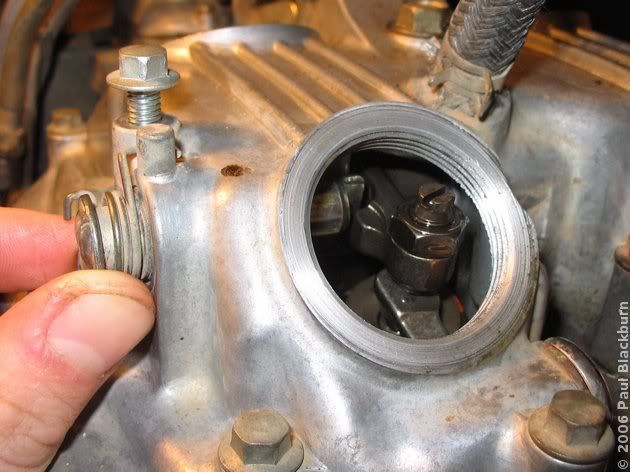
Since it is a mechanical item that physically actuates one of the valves, the best thing to do is disconnect it completely, so it doesn't affect your measurements or settings. The easiest way to do this is to remove the 8 mm mounting bolt that holds the cable in place on the valve cover.
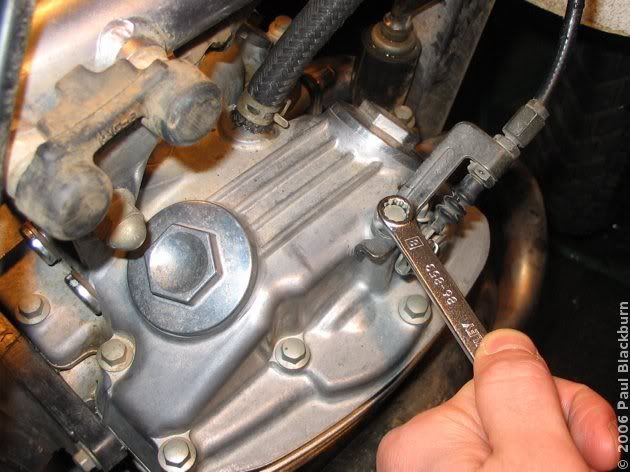
Unfortunately, the tools I have are not adequate to get at the two intake valve port covers, so I had to use the ratchet and an extension rod, and also remove two engine mounting bolts.
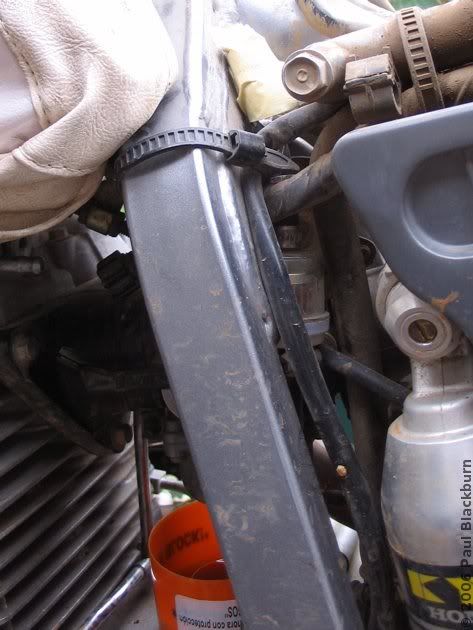
I'm almost there, but I also must remove this rubber block, that the gas tank sits on.
Almost!
Done. Looking into the engine, and looking at the shop manual illustrations, I ask myself: and now what the hell do I do!
It turned out to be not so hard after all. If there's one thing I learned from my second valve adjustment, it's this: don't be an idiot, bend those feelers! You'll have to wait until that post is translated to read all the details, but I'll just say that if you can bend your feelers like this:
things are a lot easier. And that way, you can slide the feelers in like this:

and get a good, solid measurement, instead of like this:
which basically sucks and is extremely hard to do. Note that it seems that some feelers snap, so try to bend them in different places, and buy the cheapest chinese crap you can.
The Haynes and shop manuals basically say the following: "With the engine completely cold, loosen the adjustment screw lock nut, and insert a feeler in the gap, and turn the adjustment screw. A correct position is such that a slight friction is felt when sliding the feeler in and out. If the friction is too great, then the screw is too tight".
What?! I have not a fucking clue where I should shove this feeler.
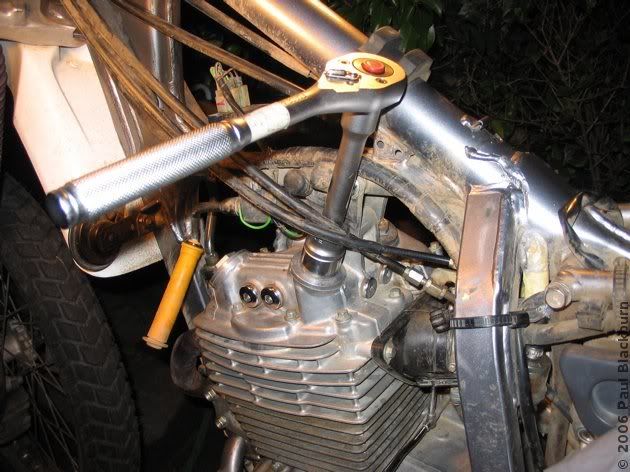
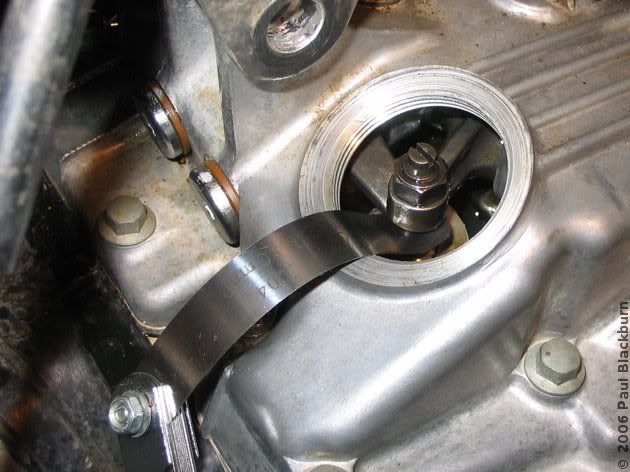
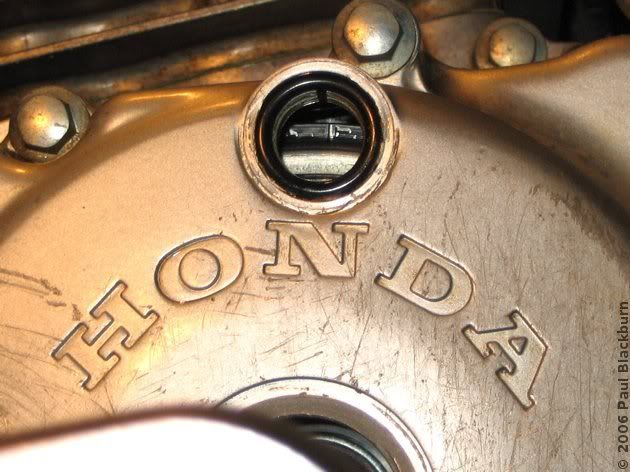
I kept reading. Of course, before all this, it is necessary to make sure that the piston is at Top Dead Center (TDC) and on the compression stroke. This insures that all four valves are completely closed. How do we find TDC? On the left crankcase cover there are two holes, one is called the timing hole and the other larger one, the crankshaft hole.
Both covers are removed, and with a ratchet one can turn the engine over by hand.
The engine is turned over in an anti-clockwise direction (this is very important) until the "T" mark lines up with the notch in the crankcase. There are several ways of making sure that this TDC point is for the compression stroke. One, is with a dowel shoved into the cylinder via the spark plug hole. You will feel the piston rising up to the top, which is TDC. Another method, which I prefer, is to set the flywheel at the "T" mark, which is TDC, and then wiggle the valve rocker arms with your fingers. If they make a "tic tic" sound, then you're on the compression stroke. It is a very small movement, so look for the tactile sensation of them clicking as you wiggle them, rather than some macroscopic movement. If the TDC you are on is, in fact, on the exhaust stroke, the valve rocker arms will not move at all. Not one bit.
So, to sum up:
The problem is that I had no idea what "slight friction" is when sliding the feeler in and out. I developed a procedure of sorts.
Now, as I said before, you can do it this way, or you can bend those feelers. Here's what I posted on the subject the other day on ThumperTalk.com, after doing my second valve adjustment:
Once you're done, put everything back together.
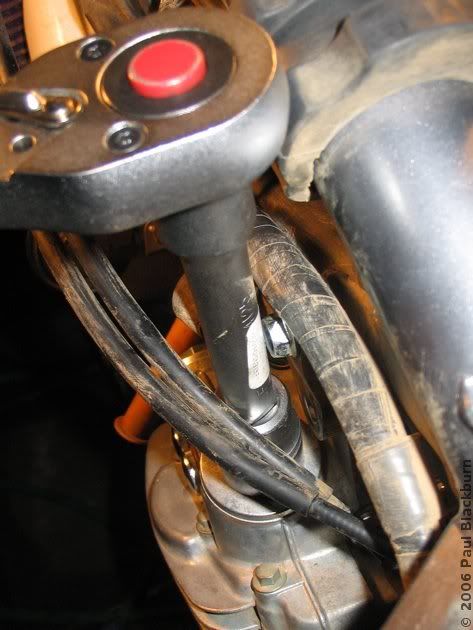
As a bonus, here's how the manual decompressor works. When you pull on the cable, the decompressor turns, and eventually it meets the valve rocker arm. If it keeps turning, it pushes the arm down, and thus opens the valve.

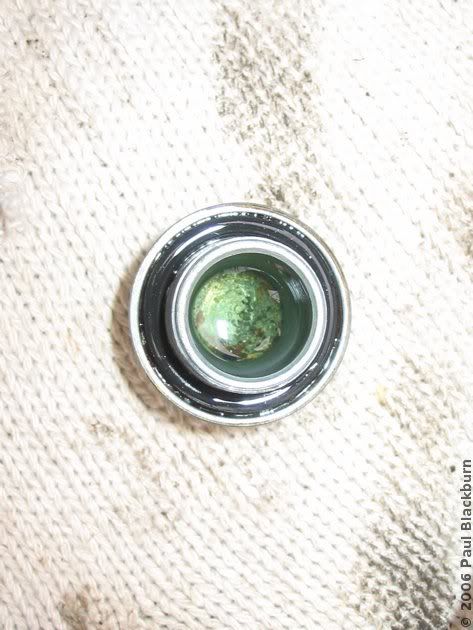
Footnote: When I changed the fuel filter, I noticed something strange:

It turned out to be water, probably rusty water from the bottom of old gas station storage tanks. It smelt foul.
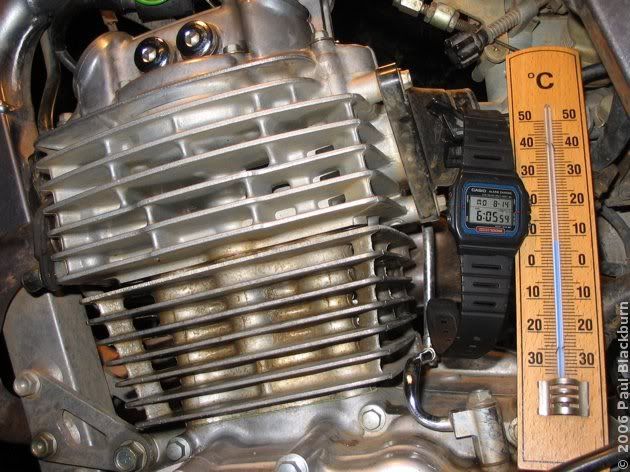
Finally, this is when I finished, and the ambient temperature....
A few days ago I finally got down to doing something that I had set my sights on quite a while ago: adjusting the valves on my 1996 XR 250 R. I'm not sure if it would be correct to say that it was due; though the shop manual certainly indicated that it was time for it--
-- this maintenance schedule is probably based on the notion that the bike will be used in a much more aggressive fashion, off-road, where the hours of use will add up faster than the kilometres will. The bike now has about 14000 km on it, and I bought it at 4000. I suppose it got a valve adjustment before I bought it.
In any case, I wanted to learn how to do it. Part of the point of having a motorbike is learning about mechanics, and sending it off to the mechanic will get you nothing but (at best) a serviced bike and (at worst) a complete and utter nightmare. Particularly if you insist on searching for a "good and cheap" mechanic. That's the way things are here in Chile, and it probably isn't that different around the world. (As I translate this post, a few months after I wrote it, and after having recently completed my second valve adjustment, I can safely say that you do NOT want the guy working on your bike to cut corners, or be rushed. If I did this for a living, I'd charge as much as I could, and even then I'm not sure if I'd do it for money. It takes a lot of patience and dedication).
If you do your mechanical work yourself, you can be absolutely certain that things were put back together with a torque wrench, and you know for certain that nothing was damaged in the process (one hopes!). The torque wrench is particularly important when working with bots that thread into the aluminium crankcase, like the oil filter cover bolts, and the oil drain plugs, not to mention the valve gap adjustment nut-- you certainly don't want that coming loose inside the engine, do you now?
Let's start from the beginning.
What is a valve, and why do they need adjusting anyway?
In the following illustration, which depicts a four-stroke engine, the valves are the two flat-headed rod thingies placed slightly diagonally at the top of the engine.
They basically determine when the air and fuel mixture can enter the cylinder, it must remain trapped, and when the exhaust gases can escape. The point is not to explain what an Otto cycle is; for that, take a look at this page.
The illustration isn't entirely correct, since it depicts a cylinder with infinite compression; when the piston is at the top of its journey, it should leave a gap above it. Also, in my engine, the egg-shaped wheel that pushes the valve down (the cam, mounted on the camshaft) doesn't actually push on the valve itself. It does so by means of a rocker of sorts, but you get the idea. The illustration also depicts two camshafts, while in my engine, there is only one central one.
Another illustration of the Otto cycle:
(1st stroke: Admission, 2nd stroke: Compression, 3rd stroke: Expansion, 4th stroke: Exhaust. Also: 1 - Intake valve, 2 - Spark plug, 3 - Exhaust valve, 4- Combustion chamber, 5 - Piston, 6 - Rings, 7 - Cylinder, 8 - Connecting rod, 9 - Crankshaft)
The normal position of the valve's flat head is against the valve seat, forming an airtight seal, allowing the cylinder to remain hermetically sealed off. They are held in this position by a strong spring.
When a valve opens, it does so because it is pushed downwards by the rocker arm. It contacts the narrow end of the valve, and the flat head is moved into the cylinder cavity slightly. This allows the fuel-air mixture to enter, if it is the intake valve, and the exhaust gases to exit, if it is the exhaust valve.
Now the important bit is that between the rocker arm and the end of the valve, there is a very small gap, a few thousandths of an inch across (that would be about 0.1 mm, in more sensible units). This gap is left so that the valves can expand feely as the engine warms up.
If this gap were not left between the rocker arm and the valve, bad things would happen. As the engine warms up the valve will expand, and it will do so most noticeably in the longitudinal direction. Since the flat head is held tight by the valve spring against the valve seat, the tail end of the valve will advance towards the rocker arm. If there were no gap, the tail end would simply contact the rocker arm, and instead the valve would be displaced slightly towards the cylinder, due to its own thermal expansion, thus impeding a proper seal against the valve seat.
The result of this unwanted situation is that the cylinder no longer manages to maintain a high level of compression when it needs to, and thus loses power. Also, if this were to happen on the exhaust valve, the permanent leaking of high pressure, high temperature gas around the valve seat will over heat and even possibly melt the valve. Not a pretty sight.
So as to avoid all of this, we always leave a small separation between the rocker arm and the valve. The exhaust valve's gap is slightly larger, because it will always be slightly hotter than the intake valve.
And what if the gap is too large? As the rocker arm comes down on the valve end, it has longer to travel before it makes contact. Since the rocker arm is driven by a lobe on the cam wheel, its initial velocity is small, but its intermediate velocity is large. If there is an excessive delay before it hits the valve, it will have acquired greater speed, and thus the impact will be larger. This will eventually wear down the rocker arms, valves, camshaft and so on. Also, the synchronization of the valve's opening and closing will be thrown off.
And why do we care about all this? Because it is necessary to check the valve separations periodically, to make sure that everything is in order. And why would it change in the first place? Because things wear down, like the valve, seat, for example. As the valves are hammered millions of times against the valve seat, they will slowly start receding upwards, thus decreasing the gap between the valve and the rocker arm, and we already know that this gap can't be left too small.
Just so you get an idea about what things look like in this engine, here's an expanded view.
To be able to get at the valves and get to work, it is necessary to remove the fuel tank and the seat. Here's the whole bike:
The seat is removed by taking out two 12 mm bolts where the rack bolts on to the frame. A quick yank backwards and it comes off.
Now the gas tank. I decided to drain the carb's float bowl, because I wanted to change the fuel filter later on. This carb is easy to get at: just remove the plug at the bottom of the float bowl, and you have access to the main jet. This is also a quick way to drain the float bowl.
Then, unscrew the thingy that keeps the fuel line on the fuel petcock.
I covered it with paper towel and masking tape, and a bit of plastic bag, because I would later hose down the bike.
The carb's float bowl plug had some crap in it. This is the kind of crap that can ruin a ride if it gets in your slow jet.
Now we can remove the gas tank. I think it's held on by two 10 mm bolts.
And here's the bike, as a skeleton.
After my ride to Laguna Verde the other day, everything was covered in that clay-like mud, and it would have to come off. It is absolutely inadmissible to have a piece of dirt fall into you engine.
Ok, now everything is clean on the outside. Removal of the spark plug is in order, so turning the engine over by hand is easier, since you don't have to work against the cylinder's compression. I wasn't able to get a good grip on the spark plug with the tool, and I surmised that that was due to the presence of stones and crud around it.
Instead of just using a mirror, like any smart person would do (and this only occurred to me during my second valve adjustment), I shoved the camera in and took some pics.
It took me 20 minutes to try to clean that crap out with cotton swabs, bamboo sticks and paper towel. No go. If I removed the spark plug with all that crud floating around, something would certainly fall into the cylinder, and that would be bad. I decided to hose the area, and dry it.
As an almost irrelevant precaution, I decided to make sure that the spark plug was in fact firmly screwed in. I had thought that the reason the spark plug tool went round and round without gripping the plug was that there was debris getting in the way. I reached in and wiggled it, and... it moved! I had indeed been turning the spark plug this whole time, crud or no crud. If I had shoved a hose in here, it would probably have been the end of my engine.
I tightened it up, washed the area, and sprayed WD40 all over the place, and dried everything as best I could with paper towel. I removed the damn spark plug.
One should also remove the manual decompressor cable. This cable connects to a small lever on the left handlebar (which typically evokes the question "And what does this do, then?"). When you pull this lever, the cable operates a mechanism that pushes one of the exhaust valves down slightly. This allows the piston to rise easily, without compressing the air in the cylinder. It is typically used to make starting easier. Sometimes you don't have enough space on the right side of the bike to use the kickstarter (on a hill, for example) and the decompressor allows you to put the piston about halfway up the compression stroke before kicking the kickstarter, and most of the time, this half-kick will get the engine started. Also, if the engine floods, due to having dropped the bike, for example, you activate the manual decompressor, open the throttle 100%, hold the engine kill switch, and kick the engine over several times. This dries out the cylinder and spark plug. If you didn't use the decompressor, you'd be working against the cylinder's compression.
Since it is a mechanical item that physically actuates one of the valves, the best thing to do is disconnect it completely, so it doesn't affect your measurements or settings. The easiest way to do this is to remove the 8 mm mounting bolt that holds the cable in place on the valve cover.
Unfortunately, the tools I have are not adequate to get at the two intake valve port covers, so I had to use the ratchet and an extension rod, and also remove two engine mounting bolts.
I'm almost there, but I also must remove this rubber block, that the gas tank sits on.
Almost!
It turned out to be not so hard after all. If there's one thing I learned from my second valve adjustment, it's this: don't be an idiot, bend those feelers! You'll have to wait until that post is translated to read all the details, but I'll just say that if you can bend your feelers like this:
things are a lot easier. And that way, you can slide the feelers in like this:
and get a good, solid measurement, instead of like this:
which basically sucks and is extremely hard to do. Note that it seems that some feelers snap, so try to bend them in different places, and buy the cheapest chinese crap you can.
The Haynes and shop manuals basically say the following: "With the engine completely cold, loosen the adjustment screw lock nut, and insert a feeler in the gap, and turn the adjustment screw. A correct position is such that a slight friction is felt when sliding the feeler in and out. If the friction is too great, then the screw is too tight".
What?! I have not a fucking clue where I should shove this feeler.
I kept reading. Of course, before all this, it is necessary to make sure that the piston is at Top Dead Center (TDC) and on the compression stroke. This insures that all four valves are completely closed. How do we find TDC? On the left crankcase cover there are two holes, one is called the timing hole and the other larger one, the crankshaft hole.
Both covers are removed, and with a ratchet one can turn the engine over by hand.
The engine is turned over in an anti-clockwise direction (this is very important) until the "T" mark lines up with the notch in the crankcase. There are several ways of making sure that this TDC point is for the compression stroke. One, is with a dowel shoved into the cylinder via the spark plug hole. You will feel the piston rising up to the top, which is TDC. Another method, which I prefer, is to set the flywheel at the "T" mark, which is TDC, and then wiggle the valve rocker arms with your fingers. If they make a "tic tic" sound, then you're on the compression stroke. It is a very small movement, so look for the tactile sensation of them clicking as you wiggle them, rather than some macroscopic movement. If the TDC you are on is, in fact, on the exhaust stroke, the valve rocker arms will not move at all. Not one bit.
So, to sum up:
- Remove the seat and gas tank.
- Clean the engine and frame over the engine.
- Remove the spark plug.
- Remove the four valve hole caps. If you need to, remove one or two engine mounting bolts. Remove the rubber block if it gets in your way.
- Remove the side hole covers.
- Find the "T" mark on the flywheel by rotating it counter-clockwise. Check for play in the valve rocker arms to make sure you're on the compression stroke. If you're on the exhaust stroke and set the valves, every source I've read says basically you stand a good chance of buggering your engine next time you fire it up.
- Use the feelers to set the correct valve clearance. Take my advice and bend those feelers, and forget about that giant mental wank about "a lot of friction" and "a little friction" while sliding them in and out. They fit, or they don't.
The problem is that I had no idea what "slight friction" is when sliding the feeler in and out. I developed a procedure of sorts.
- Insert the feeler. Tap the rocker arm with your finger. If you hear of feel a "tic" sound, then there is still space, and you should tighten the adjustment screw. Turn the lock nut with the torque wrench.
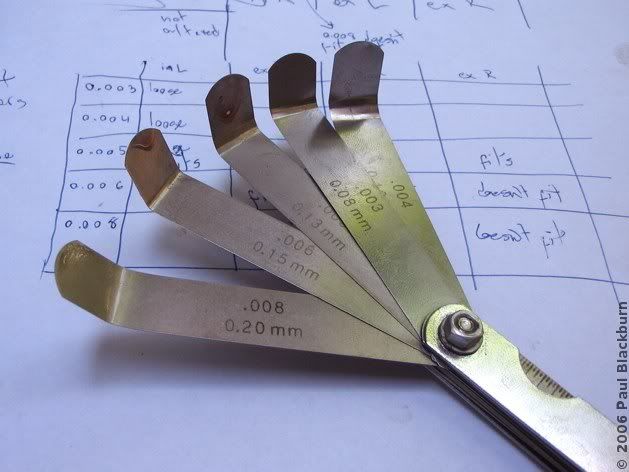
- Once the nut is tight, inset the right feeler again. You probably won't be able to get it in, because when you turn and tighten the lock nut, the adjustment screw turns as well. This is very irritating. When you have perfected this step, try inserting a larger feeler. For example, if you wish to set the valve at 0.004 in, try inserting a 0.005. It should be hard or impossible.
Now, as I said before, you can do it this way, or you can bend those feelers. Here's what I posted on the subject the other day on ThumperTalk.com, after doing my second valve adjustment:
If you are measuring the clearances, and if the 0.005 fits and the 0.006 doesn't, then the clearance is technically within spec. This means that the clearance is anything below 0.00599... (in theory).
I found that once I bent the feelers, that whole "a bit of friction" versus "more scrapy type friction" versus "a lot of grinding friction" when sliding them in and out was just a giant mental wank, caused by bending the feeler in an S shape as shown in the shop manual (monkey see, monkey do).
In any case, the tolerance is enormous, plus minus 0.001 inch, so technically if you're aiming for 0.005, then 0.006 and 0.004 are the limits of what's ok. And this is precisely what you measure when you determine that the 0.005 fits and the 0.006 doesn't. Smart folks, the guys at Honda, no? :-)
Once you're done, put everything back together.
As a bonus, here's how the manual decompressor works. When you pull on the cable, the decompressor turns, and eventually it meets the valve rocker arm. If it keeps turning, it pushes the arm down, and thus opens the valve.
Footnote: When I changed the fuel filter, I noticed something strange:
It turned out to be water, probably rusty water from the bottom of old gas station storage tanks. It smelt foul.
Finally, this is when I finished, and the ambient temperature....
Labels: mechanics
posted by durandal at 12:13 PM
![]()


 The Lagoons of the Santuario de la Naturaleza 2: Laguna Los Ángeles
 Race Day At Leyda 4
 El Tabo and the Central Hidroeléctrica El Sauce
 Exploring The Hills Around Lampa
 A Different Route To Baños De Colina
 The Mines of the Cuesta La Dormida
 The Frozen Lagoons of the Santuario de la Naturaleza
 Second Mass Demonstration "For A Fair Tag"
 First Mass Demonstration Against The 'Tag'
 Enduro In Lagunillas
 Embalse El Yeso and Termas Del Plomo
 Ride To Peñuelas
 Cerro Chena
 Race Day at Leyda 3
 Baños de Colina 2
 Carretera Austral: Epilogue
 The Little Giant and Termas del Plomo
 Back on Two Wheels
 2006 Photographic Retrospective
 Race Day At Leyda 2
  Quantum Optics III in Pucón
 Meseta In Chicureo
 Pick Up Your Beer Bottle And Fuck Off
  Planes And Hills
 Cut-Off Road
 Lagunillas
 Laguna Verde 2
 Ride To Anywhere But Aculeo
 Cerro El Roble, Second Attempt
 Baños De Colina
 Some Walk On Water...
 Race Day At Leyda
 Almost Cerro El Roble
 Off To Curacaví with Andrés
 La Serena, Part 3: Back To Santiago
  A Bull, Two Cows and a Chilean Fox
 Escape To Cuesta La Dormida
 Valve Adjustment
 La Serena, Part 2B: Valle Del Elqui
 La Serena, Part 2A: Coquimbo and La Recova
 Mud And Pine Trees
 La Serena, Part 1
 Pimp My Exhaust
 Ride To Laguna Verde
 Ride To La Mina
 Ride To Termas El Plomo
 Camping in Colliguay
 Ride To Portillo
 Ride To Olmué and Con Con
 Siete Tazas
 Watching The Departure Of The Day That Brought Me Here
 Buenos Aires Motorbikes
 Ride to Talca with the Adach Group
 Las Trancas '05
 Towers and Hills
 María Pinto, Melipilla, Aculeo
 Me and my Carb


5 Comments:
Great work dude, you made me relax, cause I was a bit concerned about those rocker arms moving up and down and was not sure if this is OK.
what a detailed and graphically inclined blog you have here. this is very good! great stuff
Definitely have to bookmark this page, and whats best is you described it as easy as possible for some of those "noobs" out there..
I'm still deciding whether i should take the extra step and decide to do the valves myself, but reading this sure did make me feel alot more confident.
Thanks Mate!
great post bro im a 31 year old with no mechanical know how who just purchased an 02 xr 250r had to get it bored to 75.5 mm and it wouldnt start adjusted my valves by following your post and it fired up right away, for all the people youve helped thank you my bike runs amazingly and its mostly due to you thanks
great post dont know much about bikes but i followed your post and my bike runs like a raped ape thanks
Post a Comment
<< Home